Introduction to Mushroom Cultivation
Mushroom cultivation requires specific conditions and careful attention to detail. To ensure success and a steady income from a home-based business, proper training is essential. At institutions like IIHR (Indian Institute of Horticultural Research), you can acquire the knowledge and experience necessary for successful mushroom cultivation.
Mushroom Varieties Three common mushroom types for cultivation a) White Button b)Milky c)Oyster.
We will explore about the Cultivation of Milky and Oyster Mushroooms
Materials You’ll Need:
- Mushroom Spawn: You can purchase mushroom spawn (mycelium) from a reputable supplier .
- Substrate: This is the material on which the mushrooms will grow. Common substrates include Paddy straw, sawdust, cardboard, or coffee grounds, depending on the mushroom species.
- Container: A suitable container to house your substrate and spawn, typically a plastic bag or container with ventilation holes.
- Hygiene Tools: Gloves, face mask, and isopropyl alcohol for maintaining a clean environment.
- Growing Environment: A clean, controlled environment with adequate ventilation, temperature, and humidity control.
Cultivation Phases
Mushroom cultivation involves several distinct phases:
Phase 1: Sterilize or Pasteurize the Substrate:
- The substrate must be free of contaminants. You can sterilize it by pressure cooking or autoclaving (for agar-based substrates) or pasteurize it by heating to kill off harmful microorganisms. The method varies depending on your substrate material.Moisture content should be between 10-15%.
Phase 2: Inoculate with Mushroom Spawn:
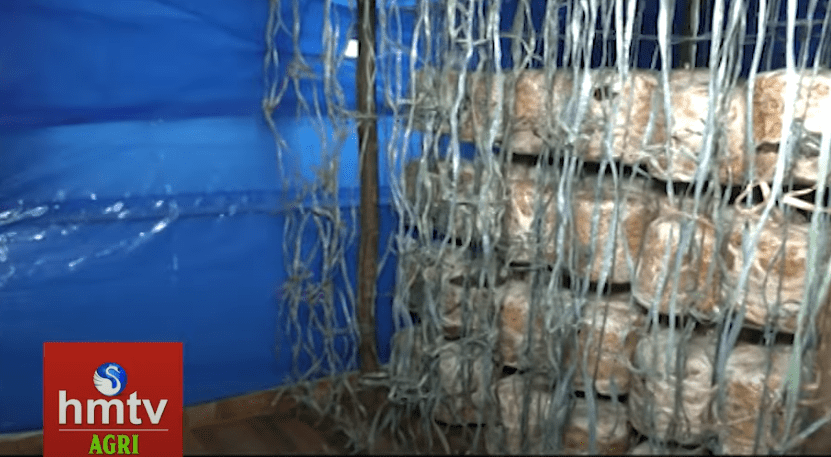
- Paddy straw is a preferred substrate material because of low cost and abundant availability, providing ample nutrition for mushroom growth. The substrate and spawn are placed in environment-friendly polypropylene (PP) covers in layers. To ensure oxygen circulation and mycelium expansion, holes are made in the PP covers.
- While arranging in the layer by layer , initially fill the bottom of the PP cover with Substrate and then in the next layer arrange the spawn and so on.
Creating a Suitable Environment
- Prepare a clean, dark room with controlled temperature and humidity.
- Sanitize the room by applying a solution of 10 ml of formalin in 20 liters of water on the walls, floor, and surroundings to eliminate harmful bacteria.
- The room should be compact, with sufficient spacing between bags for air circulation.
- Ensure the room is closed off but has small openings for air circulation.
- Maintain a constant temperature of around 30°C, as heat is generated inside the bags.
Phase 3: Incubation:
- Seal the PP cover to create a sterile environment and place it in a dark, warm (but not hot) location. The mycelium will colonize the substrate over several weeks.
- Bags containing the substrate and spawn are placed in the dark room for 21-25 days.
- Monitor the mycelium growth from outside; when the bag displays a white appearance, it’s ready for the next stage.
Phase 4: Vegetative Phase
- When the substrate is fully colonized (you’ll see a white, web-like mycelium covering it), it’s time to induce fruiting conditions.
- Maintain high humidity (around 90%) to promote mushroom growth.
Phase 5:Casing
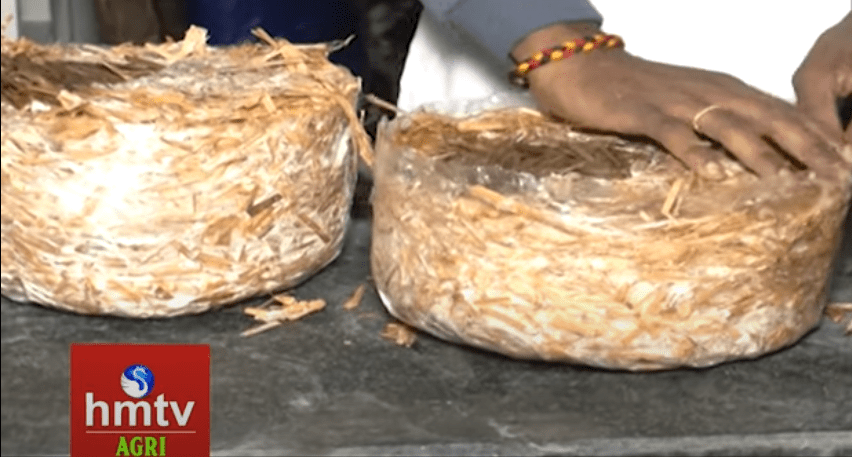
- The incubated bags are cut into two halves.
- From the top,each half is filled with a mixture of Coco peat, black soil, and Vermicompost to a height of 2 inches.
- Using black soil is preferred over red soil to extend the shelf life.
- These half bags are then moved to a light room, maintaining proper moisture levels.
- For 24 hours after transferring to the light room, avoid watering to allow mycelium to adapt to the soil.
- Typically, you can obtain 3 to 4 crops from each bag in this process, known as casing.
- Use glue mats to control insects attracted to the light in the room, as they can disrupt mushroom growth.
Phase 5:Harvesting and Reuse

- After casing, it takes approximately 15 days for mushrooms to reach the harvesting stage.
- Once harvested, these milky mushrooms have shelf life of 7 days.
- Following the harvest of fully grown mushrooms, the next crop will grow in a similar manner.
- After 3 to 4 crops, the bag will contain no moisture, indicating that no further crop can be obtained, but the soil and remaining paddy straw can be reused.
Optimal Conditions
Maintain the following conditions during cultivation for Milky Mushrooms:
- Temperature: 28°C
- Relative humidity: 80-90%
- Use mist makers in the light room if necessary to ensure adequate moisture, operating them four times a day for 10 minutes each time.